
Paper mache ideas (or papier mache as its often called) are very similar to sculpting. It is not however, an activity for clean freaks. It can get very messy but, kids love it and they get to make some useful things with this material.
There are different kinds of paper mache ideas. You can create a bowl like seen above, or use the bowl to create a mask as seen below.

I explain in greater detail how to create those paper mache masks. This post is to give you basic ways of making paper mache projects.One way of making paper mache crafts is to cover items with the paper mache, transforming it and reshaping it. Another is to sculpt with the material itself.
Paper mache projects take a while to create as you need to allow lots of time for the layers to dry.(It’s great if you want an ongoing project but, not if you need something quick)
I am going to run through the basics how to of paper mache and then give you some paper mache ideas for kids to make.
To make basic paper mache you need three basic things. Paper, some form of mold and some kind of paste. For paper you can use:
Old newspapers cut into strips
Paper towels cut into strips
Brown paper towels cut into strips
For paste: You can use a few different pastes.
- Regular glue mixed with glue. One part water to two parts glue.
- Wallpaper paste. Just follow directions and use a drop less water than instructed. If it is too thick then just add a bit more water
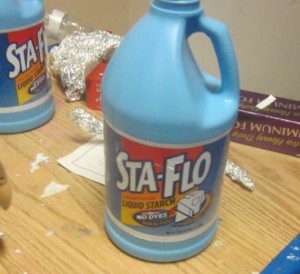
- Liquid starch
- A flour/water combination.Mix one part flour with about 2 parts of water until you get a consistency like thick glue. Add more water or flour as necessary. Mix well to get out all the bumps. Add a few tablespoons of salt to help prevent mold!
I recently decided to use the liquid starch and bought it in Walmart. It wasn’t so easy to find, however and I took the last 2 bottle left (I don’t know why there was such a rush on liquid starch 🙂 so you can buy it online you like Sta-Flo Liquid Starch.
If you don’t like any of these mixtures you can even use strips of adhesives from the medical supply store, just wet them and apply.
Directions:
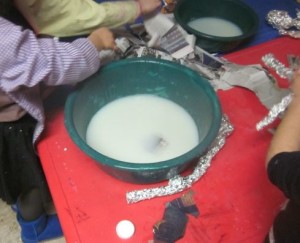
- Pour mixture into bowl
- Tear newspaper into strips.
- Dip one piece of newspaper at a time into prepared paper mache paste.
- Hold the strip over the paste bowl and run it through your fingers to squeeze off excess paste.
- Dip one piece in paste at a time squeeze off excess and smooth down over mold with fingers completely cover your creation with a layer of newspaper strips. They should all be over-lapping.
- After one layer is applied, let it dry about 24 hours.
- Add another layer of newspaper strips and let dry another 24 hours
- Repeat this process until you get the desired effect, but you should have at least three layers.
- Paint, decoupage or decorate.
Tips for better paper mache
- Be generous when dipping the newspaper strips into the paste — you want each piece thoroughly saturated!
- Let each layer dry completely before adding another.
- When working with paper mache tearing the strips of paper is better than cutting because torn strips lay better. Also, the fibers in newspaper run in one direction, so tear the paper along the “grain” to obtain long strips.
Making fine detail in your paper mache pieces
If you are making fine detail on your paper mache projects then basically make the mixture below and it sort of makes like a clay that you can mold to your specifications. You also only need 4 ingredients for this.
* Newspaper
* Water
* Salt
* Glue
Instructions:
A pulp mixture is great for making smooth, fine details in your paper mache creations, or for creating small objects. It would, take a lot of it to complete a larger project.Tear the newspaper into tiny pieces and put them in a large bowl. Add just enough warm to hot water to completely cover the newspaper. Let soap overnight.
Once your newspaper has soaked for several hours, get your hands into it! Play with it, mix it, and squeeze it through your fingers until it looks like oatmeal! Try to get as many lumps out as possible. If necessary, add a bit more water and let it soak a little more.
Once you have it as smooth as possible, add a few tablespoons of salt to help retard mold. Mix it again with your hands. Once mixed thoroughly, squeeze out any excess water and add a few tablespoons of glue. Now you are ready to use your paper mache pulp. Form jewelry, ornaments, etc. After drying, objects may be painted with acrylic paints.
Molds and mold ideas for paper mache
When you want to do paper mache over a mold, you can buy a mold or you can create your own mold by crushing a bunch of newspapers or aluminum foil into a shape and then paper macheing over it.
You can use any old item you’d like and paper mache over it.You can create your own forms for your paper mache projects easily. Here are some suggestions for items to use to create forms for your paper mache projects. Some can be used as bases for the projects, while others can be used to add specific details.Store your pulp in an air tight baggie or bowl in the refrigerator if you are not using it all at one time.
Balloons – All sizes and shapes are great for bases to rounded designs.
Cardboard – Corrugated cardboard is great for bases to projects; and lightweight cardboard, like from cereal boxes, works well for details.
Chicken Wire – Use this as a base for large projects. How about making a paper mache animals or people
Masking Tape – Great for holding all the other things together while you apply the paper mache.
Newspaper – Besides being a key ingredient in holding your paper mache creation together, you can use it for creating details. Try rolling it to make an arm or leg, or crumple it up to make smaller parts!
Shoe Boxes – Cover with paper mache to make a fancy box, or use as a base for a bigger project.
Toilet Tissue and Paper Towel Rolls – Great for adding details like arms and legs.
Aluminum Pie Pans
Blown Eggs
Bottles or Jars
Cardboard Ice Cream Containers
Detergent Boxes
Frozen Juice Cans
Juice Boxes
Oatmeal Containers
Paper Cup
Plastic Margarine Bowls
You can use a lot of the above items to create large items like houses and people. You arrange them the way you want and then you wrap all of the paper mache around the pieces to keep them together.
If you are using the technique for blowing up a balloon and then paper macheing over it you must wait until it is thoroughly dry before busting it. Sometime directions call for inserting things like beans or other sound making items into the balloon before paper macheing.
Below are two images of some children creating paper mache sculptures. We created the aluminum foil sculptures
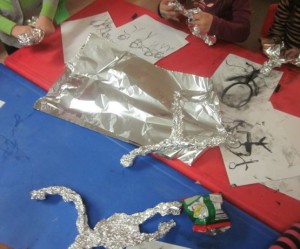

and then paper mached over them to give them form and substance.
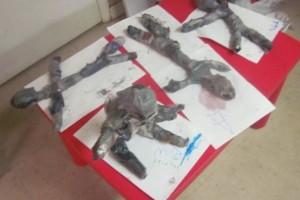
The children need to make sure they arrange the sculpture in the position they want it in before covering it with the paper mache strips. Once dried they can’t be manipulated.
Pin to save for later

")
do you have anymore paper machie things
Hi Chantelle,
There are so many ideas in this post. I explained the way to think of ideas. You can cover soemthing or make a sculpture and I explain all of the ways to do so in the post.